Welcome Message

Marvel, Muse, Manifest, Materialize. Welcome to February Jones: The Blog. While you're here I might challenge some of your opinions, show you something you never knew before, or if you're lucky, I just might melt your brain and bring you a new way of viewing the world and your place in it. And I have accessories to help you remember these new ways of thinking! View my Etsy shop items just to your lower right in my CraftCult widget, or by clicking on the Merchverse tab above. See what some of my customers think in the Testimonial section, and check out all on my interweb featurettes in the Media section. You can even watch some awesome Etsy videos in the Etsy Fun! section. I hope you enjoy the World of February Jones and come back often, things are always changing.

Friday, September 9, 2011

Spotlight on Two Sellers at Fan Expo

During my adventure at the Fan Expo convention in Toronto I perused through many amazing artists and their creations, all of them full of love and hard work and definitely some very unique and creative ideas. I'd like you to meet two people who were selling items that I just fell in love with.

Introducing the awesome creations of Kuma Crafts from the mind of Mandi :)

Mandi's awesome laser-cut acrylic creations literally stopped me in my tracks. Above is one photo that I took of her display. I'm like a raven sometimes- I can't help but hone in on bright colours and sparkly things. If anything looks good enough to eat, I'm all over it! Mandi's creations were right up my alley. After giving my peepers a visual feast of eye candy...


...I chose something for myself!!

LOOOOOOOVE!!!!!

Then I asked Mandi a few questions.

What's your favourite thing about vending at Fan Expo?
- It's my first time vending here but so far I have loved meeting so many different people and creating a connection. I love developing relationships with my customers.

What inspires you?
- There's definitely a strong Japanese pop-culture influence. I love things that are cute and colourful and kawaii.

What's been your bestselling item during this show? Is it available online?
- Ninja Cat! It can be found in my Etsy shop.

I can see why this item is a bestseller! Especially at a con. Click on the photo or follow this link to see it in her shop:  Ninja Cat from Kuma Crafts

After saying my farewell's and thank-you's to Mandi, I eventually made way to Needlings where I met Heather and her peachy-keen plushies.


 I immediately thought of one of my besties, Amy, who adores owls. Needlings is a shop full of plushies, among them are some bright and colourful, big-eyed owl sweethearts with a penetrating gaze that just makes you want to take them home.

 
Plushies in an assortment of sizes, keychains, snap-pouches, pins, and a variety of other awesome creations can be found in the Needlings Etsy shop and a variety of retail locations. I asked Heather my three questions as well:

What is your favourite thing about vending at Fan Expo?
-Definitely people watching. So many interesting people make their way through this show, and they're not holding anything back!

What inspires you?
- Colour, kids, cartoons, and cute, fun things to name a few.

What has been your bestselling item at this show?
-The Owls!


So adorable! To find some of your own, click on the photo above or follow this link: Needlings Etsy shop

*Maria

Monday, August 29, 2011

Fan Expo Adventures!

You may have noticed a lack of regular posts recently- I've been creating stuff like a possessed crafter in every free moment that I could find in preparation for Fan Expo which I attended as a vendor this past weekend. With attendance of over 70,000 fans it was an amazing experience to finally attend as a vendor. The first time I went was 5 years ago, and it was also my first date with James who is now my beloved fiance and partner in crime and crafting- so this weekend marked our 4-year anniversary, and I can't think of a better way to have celebrated :) . He helped create some comic-themed collage notebooks and sketchbooks which were a hit at the show, and of course, also encouraged me through many a late night and didn't complain about the craft-nado that had struck our small living room. Well, onto some photos of the big weekend!

 
The February Jones table in Artists Alley

 Me and my Partner in Crime and Craft, James
All of those notebooks were sold, save the one on the far left :)

 A close up of the small notebooks, larger journals, and sketchbooks


My brother Wesley on the right with his friend and co-conspirator Jason- they are 2 of 3 members of an indie videogame development team. They presented the game in a panel on indie game creation, and it is based on an online web series called Mind's Eye. Check it out here! mindseyeseries.com


 Typical amount of Artist's Alley traffic on the weekend. What a crowd!

Promo spot for a new dance game- great to watch the people testing it out, but with only 5 available songs for the beginner level, and 2 of them very popular... well, lets say that I don't want to hear them again any time soon.


And of course, this convention wouldn't be complete without some amazing costumes.... Unfortunately, I didn't get many photos. I was too busy selling ;)

*Maria

Monday, August 8, 2011

Stacked Button Rings (with tutorial!)


I spent this afternoon making Stacked Button Rings, and I had a ball! They're pretty easy, and I love the end result. I've amassed quite a collection of buttons and have been finding fun ways to use them. You can find buttons at your local sewing shop, sometimes they have discount bins that you can sift through. If you have any dollar stores nearby that have scrapbooking supplies, you might find buttons there as well. It's so much fun to mix and match different colours, and if you have a wide assortment you can make rings to match any outfits, or you can be cute and dorky and make some to match your favourite nail polish colours. *The pink and white ring was my fingernail matching creation :)

Want to make your own? Read on for the tutorial and some accompanying process photos.... Once you have your supplies, this project only takes about 15-20 minutes!

Creating Stacked Button Rings


-Flat nosed pliers
-Wire cutters
-3 buttons of different sizes that will stack atop one another
-Ring blanks for as many rings as you want to make
-About 12" of 24 gauge beading or jewellery wire

 1) Measure about 4" from one end of your wire and bend nearly in half.

2) Stack your buttons.

3) Thread the wire through 2 opposite holes from the smallest button to the largest button (ie insert wire at the top of the stack). Both ends of your wire should be coming out the bottom of the stack.

4) Using the longer wire, thread it back through the holes that the shorter wire is coming out of. Your longer wire should come out the top of your button stack. Pull tight!

5) With the longer wire again, thread it through the opposite holes back to the bottom. Pull tight to secure the stack!

6) This is how the bottom of your stack should look after securing the buttons together.

7) This is how the top of your stack should look after securing the buttons together. Pull the wires tight again to make sure the buttons are securely stacked.

8) Place your ring blank between the two wires and thread each wire through the ring, pulling tight again to secure.

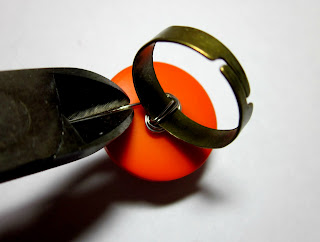
9) Wrap the shorter wire around the ring, beneath the button. Thread it through the ring again to secure it more if you like. Do the same with the longer wire. Cut the shorter wire and use the flat nosed pliers to push the cut end towards the middle of your wrappings (see image 11 for a detail of that step).

10) Wrap longer wire around a few times, always pulling tight.

11) Push in the wire with the piers, toward the center of your wire wrapping. Thanks basically it folks!

You now have a super-cute, endearingly dorky accessory customized to your colour wishes!
I'd love to hear what you think about this tutorial. Please leave any thoughts or feedback in the comments :)


Friday, July 15, 2011

Plannophobic?


The way that I see it now, the present and the future are the same thing. See, I just realized that I've had this sort of fear about planning the future- making decisions that mean if I do something, it will be at the expense of something else. There is always a trade off- if you want to be in a specific place in 5 years, you will have to make some sacrifices to make that happen, and part of making sure that you get to where you want to be is planning for it. I've always had a tendency to find ways to do all of the things that I wanted and make as few sacrifices or choices as possible. But it can't go on forever. After contemplating all of this for a while, I came to a new perspective.

The present is the now that you're stuck with, you can't change it, it is what it is. You can only change your present by planning for your future. If you don't plan for your future, you'll end up in a present that might not be exactly what you want. On the other hand, if you make plans and decide where in life you'd like to be in one year, or 5 years, and take appropriate steps to make that happen, you will see that eventually the present moment in which you find yourself is pretty darn close to that future you'd been planning. My point is, quite simply, you can't complain about where you find yourself in the present moment if you didn't plan well enough in the past to manifest the present you'd been hoping for. If you suffer from 'future-planning-phobia' like I do, it might help you to realize this as well:

Planning for the future is simply planning your present in advance.

I wish you the best of luck in designing your life! I'm going to go and try to take care of some of that now.... ;)

*Maria

Wednesday, June 22, 2011

A Workshop Wednesday

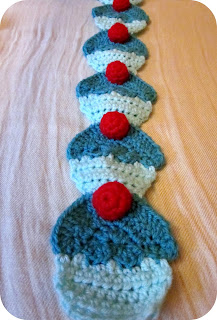
What's been keeping my fingers busy these days? A cupcake scarf!! I've had such fun making this, and I'm finally in the home stretch. I have 4 more cherries to add, and then one more full cupcake (I made one too many to begin with and didn't notice until I saw that the sides were uneven so I've gotta balance it out).


I know summer isn't exactly the time of year for crocheting scarves, but this project was just so delicious that I couldn't resist! Sometimes you just have to take a break from creating for others and create something for yourself.


You can find the 'recipe' for yummy cupcakes like this by following this link to Rock 'n' Roll Bride! You'll see the pattern for the cupcakes, but also instructions on how to turn it into a garland! Fun stuff!!

What's on your worktable this Wednesday? I'd love it if you shared in the comments :)

*Maria
Wednesday, June 15, 2011

DIY Jewellery Frame


This DIY jewellery frame project has been making its rounds of the blogosphere and the internets, so I finally broke down and gave it a try myself. Until now, I had been storing my jewellery in a very classic three-tiered jewellery box, cream coloured on the outside, red velvet inside. I'd had enough of it taking up two-thirds of my dresser space and getting this project done was part of an initiative to create the same sort of bedroom space that I'd enjoyed as a teenager- you know what I mean... the place where it's safe to dream and write in your journal about your hearts deepest desires- where your mind and spirit are free to roam and adventure and you don't have to answer to anyone else. So here we go!

 Nothing beats wearing a bowtie while you're crafting ;)
Supplies:
-wooden frame; any size you like. You won't need the glass or the backing so don't spend lots of money on an expensive frame. Check out dollar stores, garage sales, flea markets, and second hand stores like Value Village or a Salvation Army. *The thicker the frame is the better so you have some flex room with your aluminum mesh and won't have to worry about any of your screws going right through the wood*
-crafters acrylic paint and a brush or spray paint if you want to co-ordinate the frame with your room, etc. Mine was already gold.
-small screw hooks, I used 5 along the bottom for my necklaces
-2 small closed loop screws (to hang the frame)
-aluminum mesh/screen, of dimensions a little larger than your frame
-staple gun
-wire cutters or strong exacto knife (the dude at the hardware cut my section with an exacto knife)

Time Required:
About 20 minutes to put it all together, and then it took me around a half hour to get my jewellery transferred on to it. Don't forget to include drying time if you choose to paint your frame.

What to do:
1. Measure the size of the frame around the outside perimeter and cut your aluminum mesh to approximately that size.
2. If you want to paint your frame, this is the time to do it! Let it dry completely, according to instructions on your paint or spray paint.
3. Starting at a corner, use the staple gun to attach the aluminum mesh to the back of the frame. Make sure the mesh is taught, you don't want any big folds showing up in the middle.

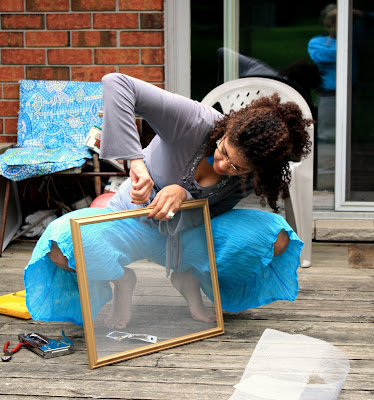
I'm screwing in the necklace hooks!
4. Once the mesh is attached, screw in the hooks that you want for your necklaces along the bottom of the frame. You can screw them so that they are pointing down, or so that they are at  right angle to the frame and pointing outwards. Mine point down because there was a stylish bump around the front of the frame. Space them equally, whether you are using, 2, 3, or 5.
5. Add the two closed loop screws to the top of the frame, to use to hang it on your wall. When you're ready to hang it, you can either put hooks in  your wall, small nails, or even a length of wire between the two loops to hang it from the center.
6. Hang it on the wall and add your jewellery!

*Maria

Wednesday, June 8, 2011

Pinterest Pleasures

I live in an area that enjoys all seasons and most standard weather types that go along with it. We had a wicked thunderstorm last night that came along with tornado warnings, and I woke to a lot of debris in the streets and many downed trees. So today I thought I'd share with you some tranquil places that I would have loved to have woken up in this morning. Enjoy!


*sigh* wishful thinking! Happy Wednesday!

*Maria