I spent this afternoon making Stacked Button Rings, and I had a ball! They're pretty easy, and I love the end result. I've amassed quite a collection of buttons and have been finding fun ways to use them. You can find buttons at your local sewing shop, sometimes they have discount bins that you can sift through. If you have any dollar stores nearby that have scrapbooking supplies, you might find buttons there as well. It's so much fun to mix and match different colours, and if you have a wide assortment you can make rings to match any outfits, or you can be cute and dorky and make some to match your favourite nail polish colours. *The pink and white ring was my fingernail matching creation :)
Want to make your own? Read on for the tutorial and some accompanying process photos.... Once you have your supplies, this project only takes about 15-20 minutes!
Creating Stacked Button Rings
-Flat nosed pliers
-Wire cutters
-3 buttons of different sizes that will stack atop one another
-Ring blanks for as many rings as you want to make
-About 12" of 24 gauge beading or jewellery wire
1) Measure about 4" from one end of your wire and bend nearly in half.
2) Stack your buttons.
3) Thread the wire through 2 opposite holes from the smallest button to the largest button (ie insert wire at the top of the stack). Both ends of your wire should be coming out the bottom of the stack.
4) Using the longer wire, thread it back through the holes that the shorter wire is coming out of. Your longer wire should come out the top of your button stack. Pull tight!
5) With the longer wire again, thread it through the opposite holes back to the bottom. Pull tight to secure the stack!
6) This is how the bottom of your stack should look after securing the buttons together.
7) This is how the top of your stack should look after securing the buttons together. Pull the wires tight again to make sure the buttons are securely stacked.
8) Place your ring blank between the two wires and thread each wire through the ring, pulling tight again to secure.
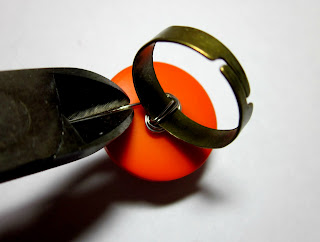
9) Wrap the shorter wire around the ring, beneath the button. Thread it through the ring again to secure it more if you like. Do the same with the longer wire. Cut the shorter wire and use the flat nosed pliers to push the cut end towards the middle of your wrappings (see image 11 for a detail of that step).
10) Wrap longer wire around a few times, always pulling tight.
11) Push in the wire with the piers, toward the center of your wire wrapping. Thanks basically it folks!
You now have a super-cute, endearingly dorky accessory customized to your colour wishes!
I'd love to hear what you think about this tutorial. Please leave any thoughts or feedback in the comments :)


Wow - that is cute! I'll try that!
ReplyDelete